When starting a new art project in Procreate, one of the first questions you’ll ask is: How Big Should I Set My Canvas on Procreate? Whether you’re drawing for fun, designing characters, or preparing for print, setting the right canvas size is crucial. It affects your image quality, file size, and how many layers you can use.
Choosing the wrong dimensions can limit your workflow or result in poor printing results. In this guide, we’ll help you determine the best canvas size and DPI settings for your specific needs, so your Procreate projects are both beautiful and efficient.
Quick Summary:
How big should a Procreate canvas be? That depends on what you are working on. For social media posts, use a canvas of 2048x2048px. For illustrations, use a canvas of 4000x5000px at 300 DPI. For prints, use 300 DPI. Always derive the optimal canvas from your end goal, be it web, print, or mobile. Also, whenever possible, use the optimal balance of quality and performance.
Understanding Canvas Size in Procreate
Before asking How Big Should I Set My Canvas on Procreate?, It’s crucial to know what the size of the canvas represents. In digital art, canvas size refers to the width and height of your artwork, usually measured in pixels.
Procreate also considers dots per inch (DPI), which determines how dense the pixels are especially important for printing. A larger canvas size allows more detail and higher resolution, but it can reduce your maximum number of layers depending on your iPad’s RAM.For a comparison of apps related to Illustration, check out our detailed blog on Procreate vs Adobe Fresco.
What Is a Good Canvas Size for Procreate?
So, what is a good canvas size for Procreate? The answer depends on your project. For social media posts, a square canvas of 2048×2048 pixels at 150 DPI works great. For more detailed artwork, you might want to go with 3000×3000 pixels.
The Best Procreate canvas size for illustration is typically 4000×5000 pixels at 300 DPI. This size offers enough resolution for both digital viewing and high-quality prints. If you’re creating art for mobile backgrounds or web, 1080×1920 pixels can be sufficient.For more comparisons, you can read our blog about Procreate vs Illustrator.
Remember: higher pixel dimensions offer better quality but fewer layers.
What is the best size template to create a logo vector on Procreate?
When creating a logo vector in Procreate, choosing the right canvas size is essential for clean lines and future scalability.
The best template size is 4000 × 4000 pixels at 300 DPI with an RGB color profile. This large square canvas gives you enough detail to draw sharp shapes, smooth curves, and precise typography.
Using a high-resolution canvas ensures your logo stays crisp when exported to vector formats like SVG or PDF through Illustrator. Always design on a bigger canvas, because scaling down is easy, but scaling up reduces quality.
Pro tip: Keep your logo centered, use separate layers for shapes and text, design in black and white first, and avoid raster effects. This ensures smooth vector conversion and guarantees your logo works in any context.
Choosing the Right DPI: Print vs. Screen
One of the most overlooked settings is DPI. For printing, 300 DPI is the industry standard, offering crisp, clear prints with no pixelation. When preparing art for digital screens, you can reduce DPI to 72 or 150, as screens don’t require as much pixel density.
If you’re wondering about the Procreate best canvas size and DPI combination for printing, a good example is 8.5 x 11 inches at 300 DPI, which equals 2550×3300 pixels. Always decide on your final output (print or screen) before selecting your canvas settings.
Canvas Size for Printing Your Artwork
If your goal is to print your art, your canvas should match standard print sizes. For example:
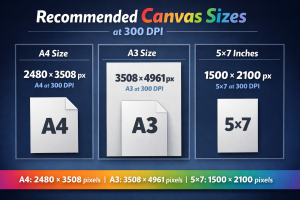
These dimensions ensure your artwork retains its quality when printed.For the greatest results, always save your file as a PNG or TIFF. Also, remember that printing on canvas, paper, or merchandise demands a higher resolution than digital-only artwork.
A3 Canvas Size in Procreate
A3 is 297 × 420 mm, or 11.69 × 16.54 inches. In Procreate, open a new canvas, choose the custom size panel, switch the units to millimetres and type the dimensions in with the DPI you need. Procreate shows the maximum layer count underneath as you type, so you can see the trade-off before you commit.
- A3 at 300 DPI: 3508 × 4961 px. This is the one to use for anything going to a printer. It is a large canvas, so expect a lower layer ceiling on older iPads.
- A3 at 150 DPI: 1754 × 2480 px. Fine for proofs, client previews and screen viewing. Do not send it to a printer and expect crisp line work.
- A3 with bleed at 300 DPI: about 3579 × 5031 px. Most printers ask for 3 mm of bleed on every side, which makes the page 303 × 426 mm. Set this up at the start; you cannot add bleed convincingly afterwards.
A3 at 300 DPI is a demanding canvas. If you are running out of layers, the usual answer is not to drop the DPI but to flatten groups as you finish them, or to work at A4 (2480 × 3508 px at 300 DPI) when the final piece will be printed at A4 anyway.
Procreate Canvas Size for Instagram
Instagram is a screen, so DPI does not matter here at all. Only the pixel dimensions do. A 1080 × 1080 image at 72 DPI and the same image at 300 DPI look identical in the feed and are the same number of pixels.
- Square post: 1080 × 1080 px (1:1).
- Portrait post: 1080 × 1350 px (4:5). This takes the most room in the feed, so it is the usual choice for artwork.
- Stories and Reels: 1080 × 1920 px (9:16).
- Landscape post: 1080 × 566 px (1.91:1).
If you want headroom to crop or re-use the piece later, draw at twice those dimensions (2160 × 2700 px for a portrait post) and export a 1080-wide copy for Instagram. Going much larger than that gains you nothing on screen and costs you layers.
For a piece that has to do both jobs, build it at print size and export a resized copy for social. A children’s book cover drawn at 300 DPI for print will downsize to 1080 × 1350 cleanly; artwork drawn at 1080 px for Instagram will not scale up for print at all.
Procreate Canvas Size for Character Design
When working on characters, you need flexibility for details, like facial expressions, costume designs, and body poses. The Procreate canvas size for character design should be large enough to zoom in and add fine lines without distortion.
A common choice is 3000 x 4000 pixels at 300 DPI. This provides enough space to work comfortably while maintaining high resolution. You can later crop or resize for different uses such as turnarounds, close-ups, or final illustrations.For exploring tools, don’t miss our guide to free Procreate brushes.
How iPad Affects Your Canvas Limits
Your iPad model plays a big role in how large your canvas can be. Procreate adjusts your canvas size, resolution, and available layers based on your device’s RAM.
For example, the iPad Pro allows more layers at larger sizes than the standard iPad or iPad Mini. Procreate will alert you if your settings exceed the layer limit, so balance canvas size and layer needs wisely. Always test your settings before starting a complex piece to avoid hitting performance walls.
Tips to Balance Quality and Performance
If you’re still asking, How Big Should I Set My Canvas on Procreate?, here’s a good rule: match your canvas to your project goals. For print, go big with 300 DPI. For digital, reduce size and DPI to keep file sizes manageable.
To avoid performance issues:
- Use only as many layers as needed
- Reduce canvas dimensions for sketches or drafts
- Export large prints as flattened images
Also, save canvas templates for repeated use. This speeds up your workflow and ensures consistency in your artwork.
Conclusion:
There’s no single answer to How Big Should I Set My Canvas on Procreate? The best settings depend on what you’re creating, how detailed it is, and where it will be used. For illustrators, the best Procreate canvas size for illustration is one that balances detail and performance. For character artists, go big enough to zoom in without losing clarity.
At The Rainbow Stories, we recommend always starting with your end goal print, web, or mobile and building your canvas accordingly. That way, you’ll avoid having to scale, crop, or recreate your work later. Procreate is powerful, but choosing the right canvas size ensures you get the most out of it.If you’re still unsure which app suits you best, check out Illustrator vs Adobe Fresco vs Procreate for deeper insights.
Ready to Bring Your Children's Book to Life?
Don't leave your story as just a draft. Led by an illustrator with more than fifty children’s books behind her, we handle character turnarounds, full-spread interior art, and print-ready publishing files for Amazon KDP, IngramSpark, EPUB and Barnes & Noble.
We do character design, storyboarding, book covers and complete books.