Typography can transform any digital artwork from simple to striking. Whether you’re creating quotes, posters, or branding designs, Procreate fonts offer a versatile way to add stunning text to your compositions. The Procreate app makes it easy to combine hand-drawn elements with stylish lettering, helping artists of all levels add polish and personality to their creations.
In this blog, you’ll learn how to use fonts in Procreate, install your own custom fonts, discover the best fonts for Procreate lettering, and explore both free and premium font options. If you’re ready to take your digital art to the next level, keep reading.
Procreate fonts help transform artwork with stylish typography.
Easy to install (.TTF/.OTF) via iPad’s Files app → “Open in Procreate.”
Best practices: pair fonts wisely, use hierarchy, adjust spacing, mix with brushwork.
Free fonts: Montserrat, Playfair Display, Pacifico, Raleway, Lobster.
Premium picks: Northwell, Amalfi Coast, Brittany Signature, Humble Script, Stay Classy.
Blend fonts with hand lettering for unique designs.
Project ideas: quote posters, social media graphics, greeting cards, branding, labels.
Incorporating Procreate fonts into your designs is a powerful way to elevate your artwork. Fonts can create a mood, deliver a message, and enhance the overall impact of your piece.
For digital artists, using typography is especially helpful when creating quote art, social media graphics, or branding mockups. Combining clean fonts with your hand-drawn work adds balance and versatility. Plus, with so many modern Procreate fonts available, you’re never limited in style. If you want to experiment further, try using free Procreate watercolor brushes for a textured, hand-painted touch.
If you’re wondering how to use fonts in Procreate, it’s easier than you might think. First, make sure your font file is either in .TTF or .OTF format—both are fully supported in the Procreate app.
To install:
From here, you can adjust font files using tools like size, spacing, alignment, and opacity perfect for customizing your layout. Beginners can also check out these 30 Procreate tips to speed up their workflow.
Adding text is simple, but making it look amazing requires thought. When working with Procreate fonts, here are a few design tips:
These tricks are essential for turning simple text into attention-grabbing design elements.
There’s no need to break the bank—there are plenty of high-quality Free Procreate Fonts available online. Great sources include:
Here are five free Procreate fonts to try:
While free fonts are great, premium options offer more character, unique glyphs, and licensing benefits. Sites like Design Bundles, Creative Market, and Envato Elements offer thousands of options tailored for Procreate users.
Top picks for modern Procreate fonts:
If you’re a fan of brush lettering, don’t think fonts are off-limits. You can blend custom fonts Procreate with your own hand-drawn typography for a unique, personalized result.
Try this technique:
This method is popular among artists creating quote art, Instagram content, and logo mockups. It gives your design structure without sacrificing that handmade touch.
Need inspiration? Try these typography-focused projects using your favorite Procreate fonts:
If you’re still exploring tools, check out the difference between Procreate and Fresco or dive into a Procreate vs Illustrator comparison. You may also like this Procreate vs Adobe Fresco vs Illustrator detailed breakdown to see which app best fits your style.
Adding stunning text to your art has never been easier. With the right Procreate fonts, you can elevate your projects from simple sketches to polished, professional designs. Whether you’re working with free Procreate fonts or building a library of premium options, exploring typography opens up a world of creative possibilities.
At The Rainbow Stories, we believe creativity thrives when you experiment—so take time to play around, combine fonts with hand lettering, and don’t be afraid to mix styles. The Procreate app gives you the tools—now it’s up to you to let your text do the talking.
If you’re diving into watercolor painting in Procreate, you’ll quickly realize the importance of having the right brushes. While Procreate offers incredible flexibility, finding quality Free Procreate Watercolor Brushes can elevate your work without spending a dime.
Whether you’re a seasoned illustrator or just exploring digital watercolor, the right brush pack can replicate the softness, flow, and texture of real paint.
In this guide, we’ve compiled the best iPad watercolor brushes available for free in 2025. These sets are ideal for artists who want realistic Procreate watercolor brushes that support fluid blending, layered washes, and expressive strokes all within your digital workspace.
Using watercolor brushes in Procreate allows artists to enjoy the fluidity and beauty of traditional watercolors with the flexibility of digital tools. Free Procreate watercolor brushes offer an accessible way to explore the medium without the mess, cost, or limitations of physical paint.
With Procreate intuitive features like pressure sensitivity, soft blending, and customizable brush texture—you can recreate realistic washes, gradients, and bleeds that closely mimic watercolor on paper.
These brushes are especially useful for layering colors, building transparent effects, and experimenting freely thanks to unlimited undos. Whether you’re sketching, painting detailed scenes, or creating stylized illustrations, digital watercolor technique becomes easy to master.
For artists who love watercolor but want a more efficient, mobile, and editable workflow, Procreate’s digital watercolor tools are the perfect solution. They bring the charm of traditional art into a streamlined, modern format—ideal for both beginners and professionals alike.
For a better idea of how Procreate compares with other tools, check out our guides on Procreate vs Illustrator vs Adobe Fresco, Procreate vs Illustrator, and Procreate vs Adobe Fresco.
Before you download, it’s important to know what makes a brush set great. The best watercolor texture brushes Procreate artists prefer usually include:
All the sets listed below check these boxes and are highly recommended for every digital artist.
This free set is one of the most downloaded Free Procreate Watercolor Brushes in 2025. AquaReal includes flat brushes, wet edges, and bleed effects that replicate real watercolor behaviors. Perfect for landscapes and moody, expressive works, it’s a favorite among nature and concept artists.
A great choice for beginners, this pack includes soft round brushes with excellent pressure sensitivity. Ideal for florals and portraits, it features subtle gradients and transparent layers for smooth digital watercolor effects.
Sadie Lew is known for creating realistic Procreate watercolor brushes, and this free sample offers a great starting point. It includes wet-on-wet textures, detail brushes, and splatter effects. A versatile mini pack ideal for various watercolor techniques.
If you’re experimenting with style, this set gives you a taste of many digital watercolor tools. With textured edge brushes, bleeds, and grainy shading, Uproot’s pack is great for mixed-media work and adding dimension.
This beautifully crafted sampler features textured and expressive tools that mimic the feel of traditional painting. Artists looking for vibrant and bold iPad watercolor brushes will appreciate the richness and depth this brush pack provides.
Installing your new brushes is simple:
Pro tip: Rename or favorite brushes for quicker access during projects.
Looking for the best free Procreate watercolor brushes for painting, lettering, and digital illustration? Here is a curated list of 50 high-quality, free watercolor brushes you can download from trusted platforms like Brush Galaxy, Gumroad, Creative Market, DesignCuts, and independent artists.
Each brush is chosen for its realistic textures, soft blending, pressure sensitivity, and natural watercolor flow.
You can find these types of free Procreate watercolor brushes on:
Brush Galaxy (large free watercolor collections)
Gumroad (artist-made free packs)
Creative Market – Free Goods (weekly free brushes)
DesignCuts Freebies
Procreate Community Forums
Independent artists’ websites
100% free to use
Beginner-friendly
Include texture, lettering, splatter, detail, and background brushes
Support pressure sensitivity for Apple Pencil
Great for painting, journaling, and digital illustration
The best websites to download free Procreate watercolor brushes are:
Some of the top-rated free Procreate watercolor brush packs for beginners include:
Streaky Watercolor Pack by Brush Galaxy – Easy-to-use strokes perfect for beginners.
Free Watercolor Essentials by Creative Market – Simple brushes with soft blending.
Beginner Watercolor Set by Gumroad Artists – “Pay-what-you-want” packs ideal for practice.
Basic Watercolor Brush Kit by DesignCuts Freebies – Natural flow brushes great for learning.
Jingsketch Free Watercolor Samples – Lightweight brushes that help beginners control textures.
FrescoFlow Soft Wash Pack – Free soft-wash brushes designed for simple watercolor effects.
These packs are simple, beginner-friendly, and work smoothly with all recent versions of Procreate.
Download the brush file (.brush or .brushset) from the website to your iPad.
Open the Files app and locate the downloaded brush.
Tap the file once — Procreate will open automatically and import it.
Open Procreate → Brush Library.
Scroll to the top where a new folder with your imported brushes appears.
Start using your watercolor brushes in any canvas.
Yes. Several free Procreate watercolor brushes fully support Apple Pencil pressure sensitivity. Popular options include:
Brush Galaxy Free Watercolor Pack – Offers pressure-responsive strokes for light and heavy washes.
Gumroad Beginner Watercolor Sets – Many creators include pressure-sensitive brushes for shading and blending.
Jingsketch Free Watercolor Samples – Designed with natural pressure control for soft-to-bold effects.
Creative Market Free Goods (Watercolor Brushes) – Weekly freebies often include pressure-sensitive watercolor brushes.
These brushes work smoothly on all recent versions of Procreate and respond naturally to pressure, tilt, and stroke speed.
Some of the best free Procreate watercolor brushes for calligraphy and lettering include:
Watercolor Lettering Brush by Brush Galaxy – Smooth pressure-sensitive strokes perfect for modern calligraphy.
Gumroad Watercolor Lettering Pack – Free “pay-what-you-want” brushes designed for script lettering.
Creative Market Free Watercolor Calligraphy Brush – Weekly freebie ideal for bold and textured lettering.
Jingsketch Lettering Watercolor Sample – Natural watercolor bleed with excellent line control.
FrescoFlow Watercolor Script Brush – Great for soft, flowy strokes and handwritten styles.
These brushes provide pressure sensitivity, smooth ink flow, and realistic watercolor textures—ideal for beginners and lettering artists.
You can find free animated watercolor brushes for Procreate on a few digital art platforms where creators share motion-enabled brush packs:
Gumroad – Many artists offer free or “pay-what-you-want” animated watercolor brushes.
Brush Galaxy – Includes motion-based watercolor brush sets created for Procreate’s animation features.
Creative Market (Free Goods) – Occasionally releases animated or dynamic watercolor brush samples.
DesignCuts Freebies – Sometimes features animated texture brushes suitable for frame-by-frame effects.
Procreate Community Forums – Artists often share free animated watercolor brushes and custom stroke files.
These resources work well for animated lettering, looping watercolor effects, and frame-by-frame motion art inside Procreate.
Want to get the most out of your new Free Procreate Watercolor Brushes? Here are a few quick tips:
Also, don’t forget that clipping masks and alpha lock can help control how and where your paint appears essential for non destructive editing.For more brush ideas, check out our guide on 10 free Procreate Brushes. And if you’re just starting out, don’t miss our tips on choosing the right Canvas Size on Procreate.
In 2025, there’s no shortage of powerful, high-quality Free Procreate Watercolor Brushes. Whether you’re creating portraits, landscapes, or abstract textures, these brush packs can help you achieve stunning digital watercolor effects that rival traditional techniques.
From grainy edges to fluid washes, these tools allow artists to explore new depths of creativity. At The Rainbow Stories, we share the best Procreate resources to make your creative journey easier. Try out the packs mentioned above and find the perfect match for your workflow. With the right Procreate tools and a little practice, you’ll master watercolor painting in Procreate and push your art to new heights—without spending a single cent.
The top free Procreate watercolor brushes in 2025 include soft wash brushes, grain texture brushes, splatter effects, bloom brushes, lettering watercolor pens, and wet-on-wet style brushes available on Brush Galaxy, Gumroad, Creative Market, and DesignCuts.
You can download high-quality free watercolor brushes from Brush Galaxy, Gumroad creators, Creative Market’s Free Goods, DesignCuts Freebies, and the Procreate Community Forum.
Yes, most free watercolor brushes released in 2025 are compatible with Procreate version 5.2+ and work smoothly on older iPads, as long as the Procreate app is updated.
Many free watercolor brushes in 2025 include full pressure sensitivity for stroke weight, opacity, and texture changes, making them perfect for realistic watercolor painting and lettering.
Yes. Many artists in 2025 use free watercolor brushes for professional illustrations, lettering, storybook art, and concept work. These brushes offer realistic textures, natural blending, and high-resolution strokes.
Whether you’re a hobbyist, a student, or someone shifting from traditional drawing to digital art, mastering Procreate can feel overwhelming at first. But with the right guidance and some practice, it becomes a powerful and intuitive creative tool.
This list of Procreate tips is curated specifically for beginners, packed with shortcuts, features, and workflows that will make your learning curve smoother. If you’ve ever wondered, “How long does it take to get good at Procreate?”The answer is: not long, assuming you start with the appropriate base.
Set the right canvas size (300 DPI for print, 72–150 for digital).
Use gestures and shortcuts (undo, redo, Quick Menu, QuickShape).
Master brushes and layers (smudge, Alpha Lock, Clipping Mask, Blend Modes).
Try advanced tools (Reference Window, Animation Assist, Symmetry Guides).
Save palettes, back up files, and keep projects light for smooth performance.
Getting started with digital art can feel intimidating, but these Procreate tips will help you become confident faster. By learning features like the color picker, clipping masks, and gesture controls, you’ll be working like a pro in no time. Still deciding which app to commit to? Read our full breakdown: Procreate vs Illustrator vs Adobe Fresco. And if you’re still wondering “How long does it take to get good at Procreate?”, the answer depends on how consistently you practice. But with this list in your toolkit, you’re already ahead of the curve. At The Rainbow Stories, we share easy guides and practical resources to help artists and beginners improve faster and enjoy their creative journey.
When starting a new art project in Procreate, one of the first questions you’ll ask is: How Big Should I Set My Canvas on Procreate? Whether you’re drawing for fun, designing characters, or preparing for print, setting the right canvas size is crucial. It affects your image quality, file size, and how many layers you can use.
Choosing the wrong dimensions can limit your workflow or result in poor printing results. In this guide, we’ll help you determine the best canvas size and DPI settings for your specific needs, so your Procreate projects are both beautiful and efficient.
How big should a Procreate canvas be? That depends on what you are working on. For social media posts, use a canvas of 2048x2048px. For illustrations, use a canvas of 4000x5000px at 300 DPI. For prints, use 300 DPI. Always derive the optimal canvas from your end goal—be it web, print, or mobile. Also, whenever possible, use the optimal balance of quality and performance.
Before asking How Big Should I Set My Canvas on Procreate?, It’s crucial to know what the size of the canvas represents. In digital art, canvas size refers to the width and height of your artwork, usually measured in pixels.
Procreate also considers dots per inch (DPI), which determines how dense the pixels are especially important for printing. A larger canvas size allows more detail and higher resolution, but it can reduce your maximum number of layers depending on your iPad’s RAM.For a comparison of apps related to Illustration, check out our detailed blog on Procreate vs Adobe Fresco.
So, what is a good canvas size for Procreate? The answer depends on your project. For social media posts, a square canvas of 2048×2048 pixels at 150 DPI works great. For more detailed artwork, you might want to go with 3000×3000 pixels.
The Best Procreate canvas size for illustration is typically 4000×5000 pixels at 300 DPI. This size offers enough resolution for both digital viewing and high-quality prints. If you’re creating art for mobile backgrounds or web, 1080×1920 pixels can be sufficient.For more comparisons, you can read our blog about Procreate vs Illustrator.
Remember: higher pixel dimensions offer better quality but fewer layers.
When creating a logo vector in Procreate, choosing the right canvas size is essential for clean lines and future scalability.
The best template size is 4000 × 4000 pixels at 300 DPI with an RGB color profile. This large square canvas gives you enough detail to draw sharp shapes, smooth curves, and precise typography.
Using a high-resolution canvas ensures your logo stays crisp when exported to vector formats like SVG or PDF through Illustrator. Always design on a bigger canvas—because scaling down is easy, but scaling up reduces quality.
Pro tip: Keep your logo centered, use separate layers for shapes and text, design in black and white first, and avoid raster effects—this ensures smooth vector conversion and guarantees your logo works in any context.
One of the most overlooked settings is DPI. For printing, 300 DPI is the industry standard, offering crisp, clear prints with no pixelation. When preparing art for digital screens, you can reduce DPI to 72 or 150, as screens don’t require as much pixel density.
If you’re wondering about the Procreate best canvas size and DPI combination for printing, a good example is 8.5 x 11 inches at 300 DPI, which equals 2550×3300 pixels. Always decide on your final output (print or screen) before selecting your canvas settings.
If your goal is to print your art, your canvas should match standard print sizes. For example:
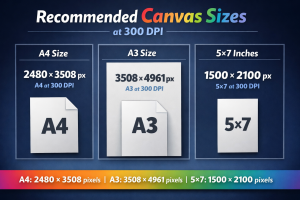
These dimensions ensure your artwork retains its quality when printed.For the greatest results, always save your file as a PNG or TIFF. Also, remember that printing on canvas, paper, or merchandise demands a higher resolution than digital-only artwork.
When working on characters, you need flexibility for details—like facial expressions, costume designs, and body poses. The Procreate canvas size for character design should be large enough to zoom in and add fine lines without distortion.
A common choice is 3000 x 4000 pixels at 300 DPI. This provides enough space to work comfortably while maintaining high resolution. You can later crop or resize for different uses such as turnarounds, close-ups, or final illustrations.For exploring tools, don’t miss our guide to free Procreate brushes.
Your iPad model plays a big role in how large your canvas can be. Procreate adjusts your canvas size, resolution, and available layers based on your device’s RAM.
For example, the iPad Pro allows more layers at larger sizes than the standard iPad or iPad Mini. Procreate will alert you if your settings exceed the layer limit, so balance canvas size and layer needs wisely. Always test your settings before starting a complex piece to avoid hitting performance walls.
If you’re still asking, How Big Should I Set My Canvas on Procreate?, here’s a good rule: match your canvas to your project goals. For print, go big with 300 DPI. For digital, reduce size and DPI to keep file sizes manageable.
To avoid performance issues:
Also, save canvas templates for repeated use. This speeds up your workflow and ensures consistency in your artwork.
There’s no single answer to How Big Should I Set My Canvas on Procreate? The best settings depend on what you’re creating, how detailed it is, and where it will be used. For illustrators, the best Procreate canvas size for illustration is one that balances detail and performance. For character artists, go big enough to zoom in without losing clarity.
At The Rainbow Stories, we recommend always starting with your end goal print, web, or mobile and building your canvas accordingly. That way, you’ll avoid having to scale, crop, or recreate your work later. Procreate is powerful, but choosing the right canvas size ensures you get the most out of it.If you’re still unsure which app suits you best, check out Illustrator vs Adobe Fresco vs Procreate for deeper insights.
Procreate has become one of the most powerful and versatile apps for digital artists, offering endless possibilities to create stunning illustrations, paintings, and designs. While the app comes with a variety of default brushes, many artists look for more variety to bring their creativity to life. That’s where free Procreate brushes come in handy. These brushes not only expand your toolkit but also allow you to experiment with new textures, effects, and styles without spending extra money. Whether you’re a beginner or an experienced professional, the right brush set can completely transform your digital art journey.
Procreate is a top app for digital artists, but default brushes can feel limiting. Free Procreate brushes—like watercolor, texture, ink, and glitter expand your toolkit, unlock new styles, and transform your artwork. Easy to install and perfect for beginners or pros.
Every great piece of digital art starts with the right tools. While Procreate comes with an impressive set of default brushes, artists often crave more variety. Custom brush sets allow creators to experiment with different effects and techniques. By exploring new options like watercolor brushes for Procreate or free texture brushes for Procreate, you can bring fresh life into your artwork. This is why downloading extra brushes for Procreate has become a must for every creative.
You can even compare across platforms with guides like Procreate vs illustrator vs adobe fresco if you’re deciding which app offers the best brush features.
This brush is perfect for sketching outlines or creating rough drafts. It mimics the look of traditional pencils, making it ideal for illustrations, comics, and even free Procreate brushes for clothing design sketches.
If you want to achieve soft blending and natural paint effects, this is a must-have. Many watercolor brushes for Procreate are available online for free, and they’re perfect for portraits, landscapes, and dreamy digital paintings.
For artists who love clean lines and detailed work, ink brushes are essential. These brushes for Procreate help create sharp, smooth strokes, often used in manga, comics, and line art.
Beautiful lettering and typography art need a steady calligraphy brush. Free sets are widely available and are a favorite among designers experimenting with hand lettering.
One of the most downloaded brush sets includes free texture brushes for Procreate. They add grain, depth, and realism to digital art. These are excellent for creating backgrounds, clothing textures, and shading effects.
Marker brushes bring bold and vibrant strokes to your artwork. Great for poster designs, graffiti art, or playful sketches, they make a solid addition to your brush library.
For raw and dramatic shading, charcoal brushes work beautifully. Artists use them for strong shadows, moody sketches, and even realistic fashion concept art.
Digital oil brushes simulate the look of thick paint strokes. This tool is perfect if you want a realistic painted effect without the mess of traditional paints.
Airbrushes create soft gradients, smooth textures, and subtle blending. Many artists use them for portraits, makeup concepts, and atmospheric backgrounds.
The glitter brush is one of the most fun free Procreate brushes available. It’s ideal for fantasy art, decorative illustrations, or adding sparkle to fashion designs.
If you’re still exploring which design software fits you best, you can check comparisons like Procreate vs Adobe Fresco and Procreate vs Illustrator to understand how Procreate stacks up against other popular tools.
Installing new brush sets is simple:
Organizing your brushes for Procreate into labeled folders can help you quickly access your favorites.
There are many websites, digital art communities, and forums where artists share free resources. From watercolor brushes for Procreate to glitter or texture packs, these platforms often release high-quality brushes at no cost. Just make sure you check the usage rights before downloading to ensure they can be used for both personal and commercial projects.
The world of Procreate is endless when it comes to customization, and downloading free Procreate brushes is one of the best ways to unlock your creative potential. At The Rainbow Stories, we believe the right tools can inspire artists to create without limits. From watercolor brushes for Procreate to free texture brushes for Procreate, each brush brings new styles and techniques to your digital art. Whether you’re sketching, painting, or designing clothing patterns, these brush sets can take your artwork to the next level.
The digital art world is thriving in 2025, with artists seeking the perfect app to bring their imagination to life. Among the most popular options, the debate of Adobe Fresco vs Procreate continues to dominate. Both apps offer unique strengths, but which one truly delivers the best experience for creative professionals and hobbyists this year? Let’s dive into their features, cost, and performance.
In 2025, the Adobe Fresco vs Procreate debate comes down to needs and budget. Procreate is ideal for beginners and independent artists thanks to its one-time low cost, simple interface, and massive brush library though it’s iPad-only.
Adobe Fresco suits professionals already in the Adobe ecosystem, offering vector, raster, and live brushes, cloud sync, and seamless integration with Illustrator and Photoshop, but it requires a subscription and has a steeper learning curve.
Procreate has built its reputation as one of the most loved digital art apps on the iPad. With its one-time purchase model, it provides an affordable option for illustrators, hobbyists, and concept artists. The app offers an extensive range of pixel brushes, smooth workflows, and tools like time-lapse recording that help artists showcase their creative process.
Best for independent artists, Procreate simplicity makes it easy to learn, yet powerful enough to create professional artwork. However, its limitation lies in platform availability still only on iPad in 2025.
Adobe Fresco, part of the Adobe products family, continues to grow stronger. Available on iPad, Windows, and some desktop platforms, it integrates seamlessly with Adobe Illustrator and Photoshop, making it a natural choice for professionals already using Creative Cloud.
The biggest draw of Fresco is its combination of vector, raster, and live brushes, giving artists flexibility that Procreate doesn’t provide. For beginners wondering, “Is Adobe Fresco good for digital art?”, the answer is yes its intuitive brushes and integration make it an excellent tool for learning and professional work alike.
Procreate shines with its massive brush library and the ability to create custom pixel brushes. Artists love the natural textures and flexibility. On the other hand, Adobe Fresco provides a unique mix of vector, raster, and live brushes, perfect for simulating real-world paint strokes. For artists who work across multiple Adobe products, Fresco’s integration makes brush management even more powerful.
Procreate’s interface is sleek, simple, and designed for minimal distraction. Beginners can start creating within minutes. Fresco, while clean, feels more familiar to users who are already used to Adobe Illustrator or Photoshop. It may seem overwhelming at first, but professionals benefit from the advanced layout.
In terms of performance, both apps run smoothly. Procreate is highly optimized for iPad, while Fresco works across devices. Fresco’s cloud sync ensures projects are always available, a clear advantage over Procreate’s standalone design. When comparing Adobe Fresco vs Procreate, workflow efficiency depends on whether you value integration or independence.
This is where Fresco wins. As part of the Creative Cloud suite, it integrates with Adobe Illustrator, Photoshop, and other tools, streamlining professional workflows. Procreate allows exports in multiple formats but lacks direct integration with Adobe’s ecosystem. Artists who regularly use Adobe products will find Fresco more efficient.
The Adobe Fresco vs Procreate cost debate is more relevant than ever. Procreate still follows a one-time purchase model, making it extremely affordable. Fresco, however, is subscription-based. Many wonder, “Is Adobe Fresco actually free?” the answer is no, though a free starter version exists with limited features.
Full access requires a Creative Cloud subscription, which can be costly for beginners but valuable for professionals who rely on multiple Adobe apps.If you’re also curious about how Procreate compares with other professional tools, check out our detailed guide on Procreate vs Illustrator
Choosing between Procreate and Adobe Fresco can be tricky for digital artists. This table highlights the pros and cons of both tools to help you decide which fits your workflow best.
| Procreate Pros | Procreate Cons | Adobe Fresco Pros | Adobe Fresco Cons |
|---|---|---|---|
| One-time low cost | Limited to iPad | Vector, raster, and live brushes | Requires subscription |
| Massive brush library | No vector brushes or advanced integration | Cloud sync across devices | Learning curve for beginners |
| Simple, beginner-friendly interface | Seamless integration with Adobe products | ||
| Great for illustrators and hobbyists | Great for professional workflows |
So, who wins in the Adobe Fresco vs Procreate debate this year? The answer depends on your needs.
For those asking, “Is Adobe Fresco good for digital art?”, it absolutely is—especially if you want realistic painting experiences with live brushes. But if cost is your main concern, the Adobe Fresco vs Procreate cost difference makes Procreate more budget-friendly.
Both apps have carved out strong reputations in the digital art community. Procreate wins for affordability, simplicity, and iPad optimization, while Adobe Fresco stands out for its integration with the Creative Cloud ecosystem, versatility with brush types, and professional workflows.
At The Rainbow Stories, we believe the choice between Adobe Fresco and Procreate in 2025 really comes down to your goals, budget, and creative style. Whether you’re sketching casually or producing professional illustrations, both tools have the power to elevate your artistry.
In the world of digital creativity, artists have an incredible range of tools at their fingertips. Among the most talked-about platforms are Procreate and Adobe Illustrator. While they’re both popular, they serve different artistic needs. When it comes to Procreate vs Illustrator, many digital artists wonder which is better suited to their style and workflow. This guide will help you understand the core differences, so you can make an informed decision based on your creative goals.
Procreate is great for expressive painting and sketching on iPad, while Illustrator is best for precise, scalable vector design. Many artists benefit from using both.
Procreate is a raster-based digital drawing app designed exclusively for iPad. It’s known for its intuitive design, powerful brush engine, and a natural drawing experience that feels like sketching on paper with the Apple Pencil.
On the other hand, Adobe Illustrator is a powerful tool built for vector-based graphics. As an industry standard in design, it allows users to create scalable illustrations, logos, and typography with precision—especially useful for professionals and commercial artists.
In this comparison of Procreate vs Illustrator, we’ll explore their strengths, limitations, and best use cases.
At the heart of the Procreate vs Illustrator debate is the difference between vector and raster graphics.
Procreate uses raster technology, meaning your artwork is made up of pixels. This gives you full control over texture, shading, and brush strokes—ideal for painting, character design, and concept art. However, resizing raster art can lead to pixelation.
Illustrator, on the other hand, creates vector graphics. This format uses mathematical paths to draw shapes, making it resolution-independent. For print projects, branding, and any art that needs to scale cleanly, Illustrator is the go-to.
So, is Procreate better than Illustrator? It depends on whether you’re focused on detailed painting or clean, scalable design.
Also Read:Illustration vs. Graphic Design: What’s the Difference in Children’s Books?
Procreate is often praised for its minimalist and intuitive interface. Beginners can pick it up quickly, and the Apple Pencil provides a seamless, natural drawing experience. It’s designed to feel like a sketchbook, making it incredibly easy to dive into creative work without distractions.
Illustrator, by contrast, has a steeper learning curve. It offers more complex tools, menus, and design features. While it’s more robust for professional workflows, it can be overwhelming for newcomers. However, Adobe Illustrator for iPad has simplified the experience slightly, bringing many desktop features to a touch interface.
If you’re just starting out, Procreate might feel more accessible—but for commercial projects, Illustrator’s depth pays off in the long run.
Procreate offers hundreds of customizable brushes, smooth blending, layering features, and animation tools. Artists love its pressure sensitivity and real-time rendering, which make painting fluid and expressive.
Illustrator focuses on shape-based tools like the pen tool, anchor points, and precision alignment. You won’t get the same brush realism, but you will gain unmatched accuracy for vector graphics and typography.
Many artists ask, “Do I need Illustrator if I have Procreate?“ The answer comes down to your artistic needs. If you only paint or sketch, Procreating may be enough. But if you need to create logos, branding, or export clean vector art, Illustrator becomes essential.
Another frequent question is: “Is Procreate compatible with Adobe Illustrator?” The short answer is: partially.
Procreate allows you to export files in PSD, JPEG, or PNG formats, which can be imported into Illustrator. However, since Procreate is raster-based, you can’t edit those layers as vector paths in Illustrator. To convert artwork into vector format, you’d need to trace or redraw it in Illustrator manually.
If you’re looking to maintain a seamless workflow between Procreate and Adobe Illustrator, be aware of their format limitations. They complement each other well, but aren’t fully interchangeable.
Procreate is exclusive to iPad and requires an Apple Pencil. It’s a one-time purchase, making it one of the most affordable digital drawing apps available.
Illustrator, available on desktop and iPad, is part of the Adobe Creative Cloud subscription. This offers access to other apps like Photoshop, InDesign, and Fresco, but at a recurring cost. For professionals working across multiple platforms, the investment is often worth it.
For beginners or budget-conscious creatives, Procreate offers excellent value. But if you’re working in a commercial design environment, Illustrator’s versatility justifies the price tag.
Still undecided between Procreate vs Illustrator? Here’s a quick breakdown:
In the creative world, there’s no one-size-fits-all answer. At The Rainbow Stories, when it comes to Procreate vs Illustrator, the real question is what your art demands. Each platform shines in different areas—Procreate in expressive illustration, and Illustrator as the industry standard for vector-based work
Finding the right drawing or painting app can make a big difference in how you work. Whether you’re sketching for fun on an iPad or creating detailed designs for print, the tools you choose shape your results. Three of the most popular options are Procreate, Adobe Illustrator, and Adobe Fresco each offering its own strengths.
In this blog, we’ll look at all three and help you decide which one fits your creative style best.
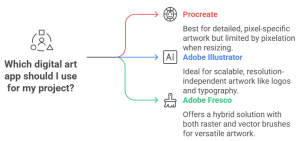
Choosing between Procreate, Adobe Illustrator, and Adobe Fresco depends on your creative needs:
Procreate:Best for beginners and hobbyists. Affordable one-time purchase, intuitive UI, tons of custom brushes. (Raster-based, iPad only)
Adobe Illustrator:Industry standard for professionals. Vector-based, perfect for logos, branding, and scalable art. (Desktop + iPad, subscription)
Adobe Fresco:Hybrid option with both raster and vector brushes. Live brushes mimic real paint, ideal for mixed-media and concept art. (iPad, subscription)
Procreate is an advanced raster-based program designed specifically for the iPad.Loved for its sleek interface and intuitive tools, it’s ideal for illustrators, concept artists, and hobbyists. It offers hundreds of custom brushes, time-lapse recording, and powerful layer controls—all in a one-time purchase format.
Adobe Illustrator is a vector-based design tool available on both desktop and tablet. It’s the go-to platform for logo design, branding, typography, and scalable illustrations. Known for its precision and depth, it’s favored by professional designers working on detailed projects.

Adobe Fresco bridges the gap between Illustrator and Adobe Photoshop, offering both vector and raster brushes in a single workspace. Its live brushes simulate realistic watercolor and oil effects, making it a top choice for painters and mixed-media artists.
When comparing Procreate vs Illustrator, user experience becomes a deciding factor. Procreate wins in simplicity. Its UI is minimal, responsive, and designed specifically for iPad and Apple Pencil users. It’s a great entry point for beginners in digital art.
Adobe Illustrator, on the other hand, has a steeper learning curve but provides deep customization and advanced features. If you’re coming from a graphic design background, it might feel more familiar.
Adobe Fresco offers a middle ground. It combines the clean feel of Procreate with Adobe’s robust feature set, making it more intuitive than Illustrator but more powerful than basic sketch apps.
Procreate shines when it comes to brush variety and customization. You can create, import, and tweak brushes to match any style. From comic inkers to watercolor artists, the flexibility is unmatched for a mobile drawing and painting app.
Adobe Fresco introduces live brushes, a standout feature. These simulate real-world paint behavior—watercolor bleeds and oil paint texture react as they would on paper. This adds a tactile, artistic feel that many painters crave.
In contrast, Adobe Illustrator focuses on precision. Its vector brushes are perfect for clean lines, icons, and scalable art. While it lacks naturalistic textures, it’s unbeatable for flat design and professional graphics.
This is where the core of Procreate vs Illustrator vs Adobe Fresco lies.
Procreate and Adobe Fresco are exclusive to iPad and work best with Apple Pencil. This makes them perfect for mobile creators and those who love to draw naturally on-screen.
Adobe Illustrator runs on both desktop and tablet (via Illustrator on iPad), giving it broader platform flexibility. For professional designers who prefer a desktop workflow, Illustrator is a strong choice.
If your workflow includes other Adobe apps like Adobe Photoshop or InDesign, then Adobe Illustrator and Adobe Fresco integrate seamlessly via Creative Cloud. You can export layered PSDs, SVGs, and AI files effortlessly.
Procreate, while powerful on its own, is slightly more limited in cross-app compatibility. You can export to PSD, PNG, or JPEG formats, but deeper integration with Adobe’s ecosystem requires extra steps.
In terms of exporting for print or animation, all three offer solid support, but Illustrator leads for scalable projects and Fresco excels in layered mixed-media compositions.
One of Procreate’s biggest advantages is its one-time purchase model. For a low price, you get access to all features, updates, and brushes—making it extremely cost-effective for freelancers or students.
Adobe Illustrator and Adobe Fresco, on the other hand, are subscription-based. Illustrator is part of the full Adobe Creative Cloud suite, while Fresco has a free tier but unlocks premium features through a subscription.
For artists already using Adobe Photoshop or other Creative Cloud apps, adding Illustrator or Fresco might be worth the investment. Otherwise, Procreate remains the budget-friendly champion.
Go with Procreate. It’s affordable, easy to learn, and has everything you need to dive into digital art without being overwhelmed.
Choose Adobe Illustrator if your work involves branding, vector art, or design. It offers unmatched precision and is trusted in the industry.
Adobe Fresco is your go-to. Its live brushes, hybrid canvas, and Adobe ecosystem make it perfect for storytelling, sketching, and layered illustration.
When it comes to Procreate vs Illustrator vs Adobe Fresco, the “best” app depends entirely on your needs. Do you prioritize creative freedom and affordability? Procreate is a solid choice. Need vector precision and professional tools? Illustrator is unbeatable. Want the best of both worlds with natural painting features? Adobe Fresco offers that flexibility.
At The Rainbow Stories, we believe all three are excellent drawing and painting apps. Your decision should align with your artistic goals, preferred devices, and budget.
No, Procreate is not an Adobe product. It is developed by Savage Interactive and is available exclusively for iPad and iPhone. Procreate is a powerful digital illustration app designed for artists, illustrators, and designers, offering brushes, layers, and animation tools. Unlike Adobe products, it focuses on a touch-based, intuitive drawing experience and does not require a subscription.
Adobe Fresco supports both vector and raster graphics. Its Live Brushes let you paint like traditional media, while vector brushes allow for scalable, crisp artwork ideal for illustrations and designs.
It depends on your needs. Procreate excels at freehand digital painting and illustration on iPad with a natural, intuitive feel. Illustrator is vector-based, ideal for logos, scalable graphics, and professional print work. Each tool suits different purposes rather than one being universally better.
It depends on your workflow. Adobe Fresco offers both vector and raster tools and integrates seamlessly with other Adobe apps, making it ideal for designers who work across platforms. Procreate, on the other hand, is highly intuitive for iPad-only digital painting and illustration, with a focus on a natural drawing experience. Each app has strengths for different creative needs.
It depends on your project. Illustrator is vector-based, perfect for logos, icons, and scalable graphics, while Procreate is raster-based, ideal for freehand illustrations and digital painting. Each excels in different areas, so “better” depends on your creative needs.